Rep Login  

How To: Passivation for Stainless Steel Vessels

How To: Passivation for Stainless Steel Vessels How To: Passivation for Stainless Steel Vessels How To: Passivation for Stainless Steel Vessels How To: Passivation for Stainless Steel Vessels


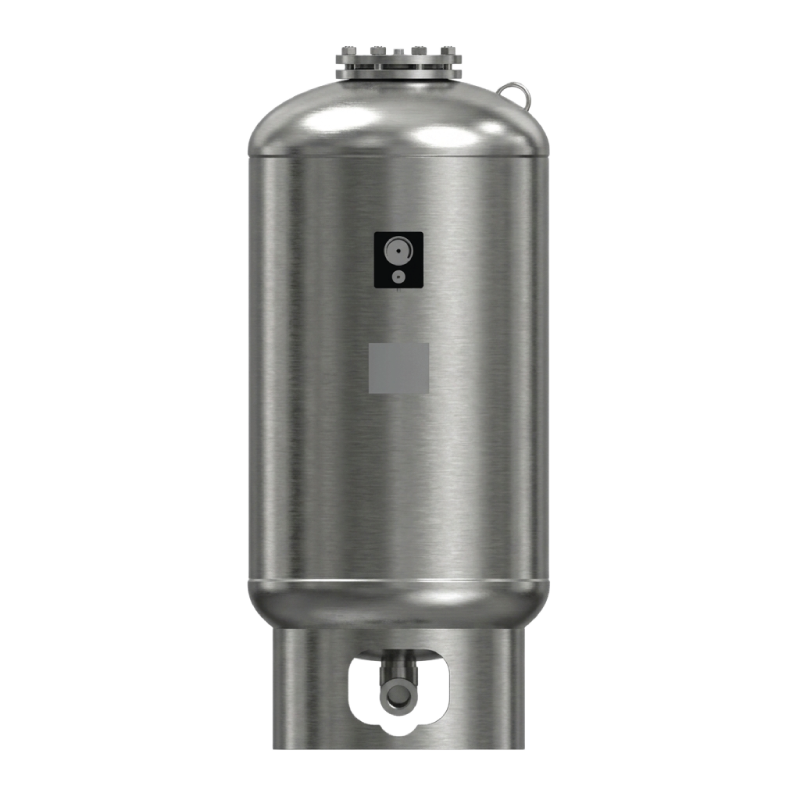
Rapid data center expansion and modern HVAC demands have led more engineers and specifiers to choose stainless steel vessels for their systems. But what exactly is passivation, and what makes a passivated stainless steel vessel desirable over traditional carbon steel?

What is Passivation?

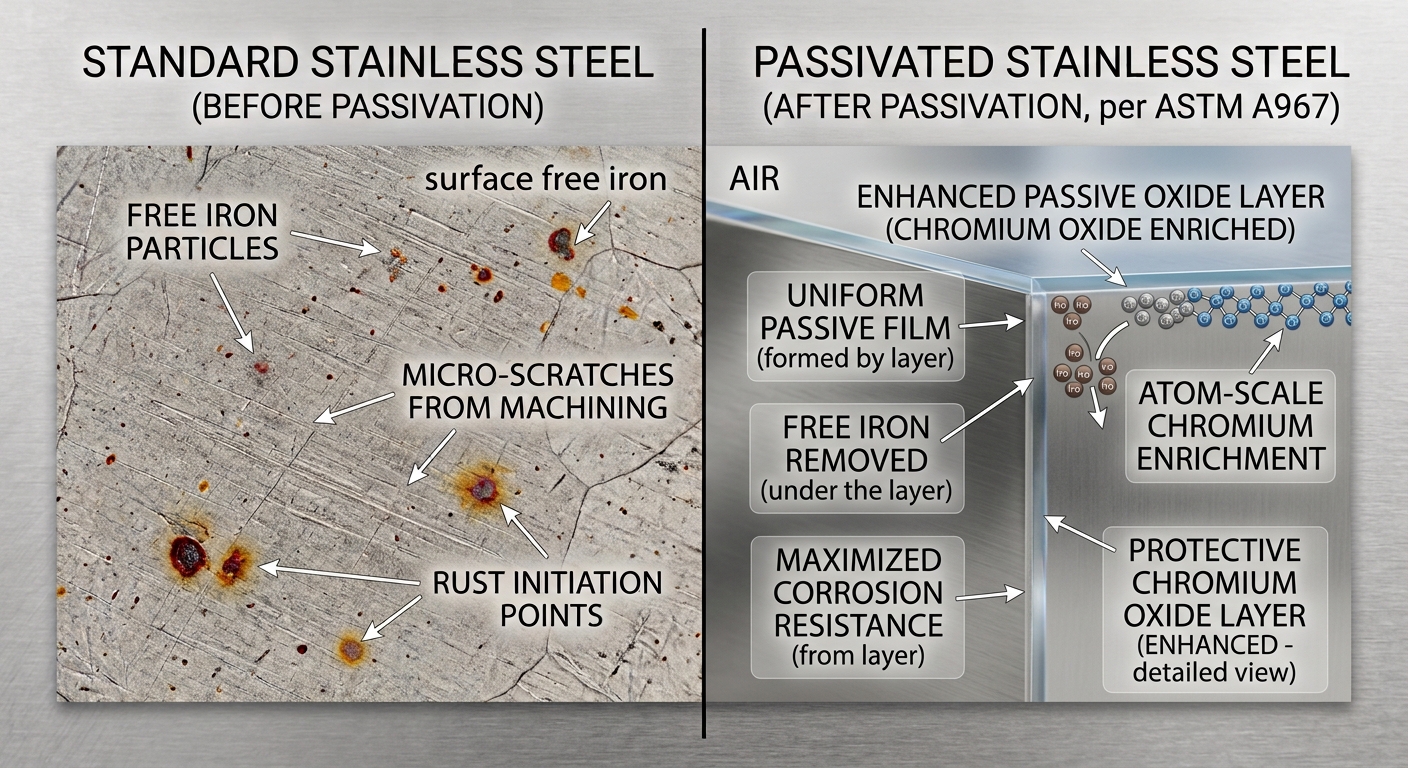
Passivation is a multi-step chemical finishing process performed after components are manufactured, welded, and assembled. Its primary goal is to maximize the steel’s natural corrosion resistance.

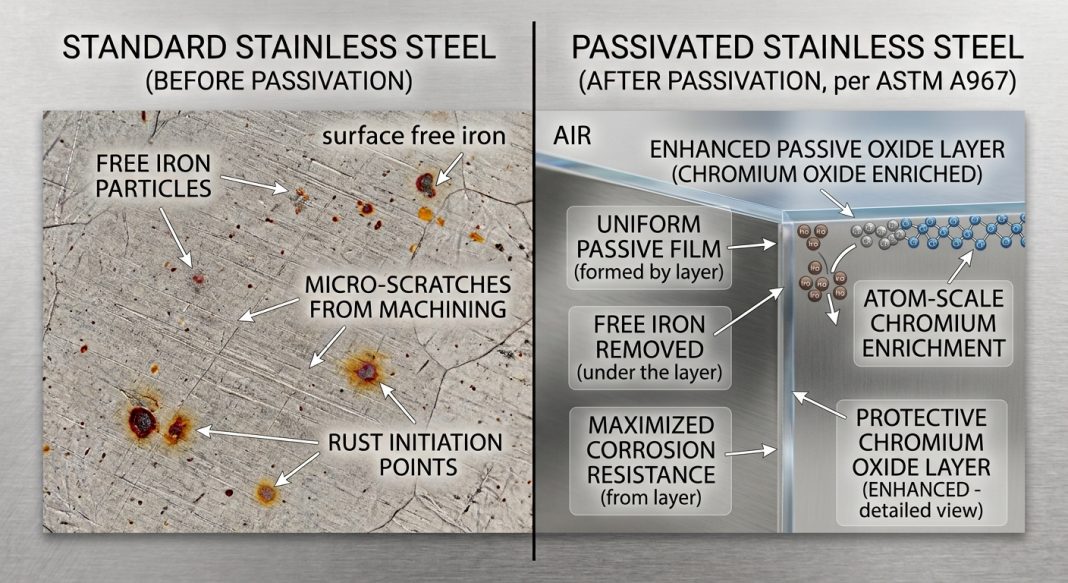
There is a common misconception that passivation physically fills surface flaws or mechanically alters the strength of the metal. In reality, it works chemically: during fabrication processes like cutting, machining, and welding, microscopic traces of free iron (tramp metal) from tooling get embedded into the steel’s surface. If left untreated, these iron particles react with air and moisture, triggering localized rust, pitting, and long-term surface deterioration.

Passivation removes these iron contaminants, allowing the stainless steel to protect itself as intended.
How Passivation Works: Building the Oxide Layer

Stainless steel owes its corrosion resistance to chromium ( of the alloy). When an acid bath selectively dissolves surface iron, it exposes an enriched concentration of chromium underneath.

Once rinsed and exposed to ambient air, this chromium rapidly reacts with oxygen to form an imperceptibly thin, continuous, and self-healing chromium oxide passive layer. This layer acts as a permanent barrier between the raw steel and the surrounding environment, keeping moisture and corrosive agents out.

Choosing the Acid Chemistry: Nitric vs. Citric

Passivation typically relies on one of two acid types:

The 4-Step Passivation Process

Achieving a true passive finish requires a tightly controlled sequence:

  1. Pre-Cleaning & Degreasing: Oils, machining coolants, and shop dirt are washed away. Acid cannot dissolve free iron if organic residues block direct contact with the metal.
  2. Acid Bath Immersion: The vessel is submerged in a controlled nitric or citric acid bath to dissolve free iron and surface contaminants.
  3. High-Purity Rinsing: The part is thoroughly rinsed with clean water to flush away acid residue and prevent chemical staining.
  4. Air Drying & Passive Layer Formation: As the vessel air-dries, exposed surface chromium reacts with ambient oxygen to form the protective chromium oxide film.

Why Passivation Is Exclusive to Stainless Steel

Passivation can only be performed on stainless steel and compatible high-chromium alloys. Carbon steel lacks the chromium required to build a protective oxide layer. If you submerge carbon steel into a passivating acid bath, the acid will aggressively etch and eat through the raw iron, weakening the vessel rather than protecting it. Carbon steel must instead rely on internal coatings, linings, or chemical system inhibitors for corrosion protection.

Stainless Steel Solutions from Wessels Company
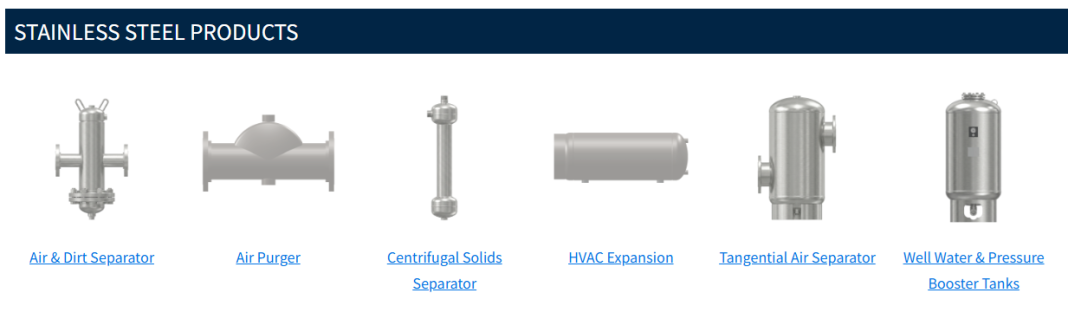
By removing surface contaminants and enabling full passive oxide film growth, passivation ensures stainless steel vessels stand up to the most strenuous and harsh operating conditions.

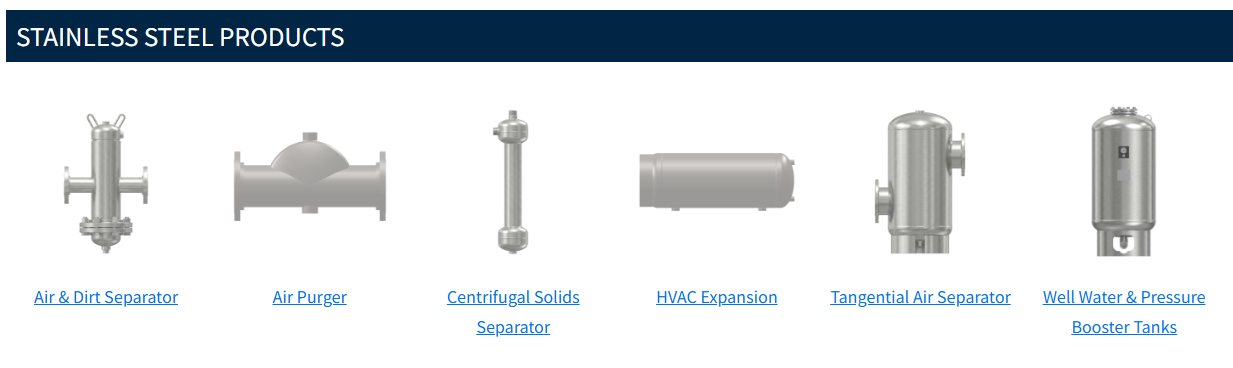
Wessels Company offers passivation options across our stainless-steel product lines, including expansion tanks, thermal energy storage vessels, and air-dirt separators. In addition, some sourcing partners offer ferrous-free facilities to prevent cross-contamination. For more information on custom stainless steel vessel options or to request a quote, visit westank.com or call our headquarters at 317-888-9800.

Full width regal divider
March Employee Spotlight

March Employee Spotlight

Tristan Cochran is one of the new smiling faces in Wessels Company’s customer service department. Tristan has been with Wessels for about 3 months and is learning about all our customers and how to best serve them. She considers herself shy, but she has quickly become a friendly and fun part of the Wessels family. When she’s not in the office, she can be found shopping and painting.  She loves pizza and enjoys watching the Colts during football season. 

Tristan’s fast facts:

Nickname: T
Favorite color: Black
Favorite food: Pizza
Likes: Kids, kind people, love and food
Dislikes: Rude people
Hobbies: Painting and shopping

How To: Understand Pre-Charge in Bladder Tanks

How To: Understand Pre-Charge in Bladder Tanks

This Wessels Company 'How To' technical blog features pre-charge in bladder tanks.

Pre-charged diaphragm and bladder tanks are necessary to protect systems from excessive pressure, energy, or water in a variety of scenarios. In this blog, we will discuss why you need to pre-charge, how to decide pre-charge settings, and the maintenance that should be done on this type of tank.

Pre-charge pressure is needed for bladder tanks which are used in HVAC domestic hot water, water well, pressure booster, and shock and surge applications. An engineer or maintenance person must first determine the application and pressure requirements of the system to determine the pre-charge setting.

For domestic water heating systems, the thermal expansion tank is positioned between the cold-water supply to the building and the water heater. The pre-charge pressure is set to equal the cold-water static or no flow condition. For example, if the supply line pressure is 60 psi, the pre-charge within the expansion tank should be set to 60 psi. As water flows, the flow pressure drops below static pressure. Thermal expansion protection is not needed since the expanded water is leaving the plumbing system. As flow stops and static pressure returns to the system, the pre-charged expansion tank is fully engaged to handle the expanded water.

A shock and surge arrestor accepts water at the quick closing valve to help dissipate the kinetic energy from the suddenly stopped water column. When water flows, every foot per second water flow velocity creates 65 psi of increased pressure over static. This spike will occur within a millisecond if the water is stopped suddenly. The kinetically created pressure reverberates through the pipe by increasing the pipe diameter to the point of relief, and as the pressure wave is reflected and returns, it constricts the pipe.

Most flow going through a pipe will be between 4 and 8 feet per second which equates to an increase of 260 to 520 psi. The pre-charge pressure for the arrestor should be set 10% below the flow pressure. The shock arrestor absorbs the excess pressure from the sudden energy surge. The pressure will equalize due to the energy absorption within the pipe. Instead of the buildup of the pressure damaging the pipe, the shock and surge arrestor takes the brunt of the pressure to ensure the safety of the pipe.

For a water well tank, or hydro-pneumatic system, a pressure switch controls the pump. The switch is normally set to a differential of 20 psi between the minimum required pressure for the building and the high pressure dictated by the switch. A home’s water well system is normally set to 2 psi below the pump cut-in to maximize the water stored, thus resulting in the longest pump run-time which helps extend the life and power of the pump. Within a commercial building, the normal pre-charge is set 10% below the pump cut-in pressure.

Yearly preventative maintenance should be completed to ensure your bladder or diaphragm tank is holding its pre-charge and thereby providing necessary system protection. The process of checking the tank begins with isolating the vessel from the system. A drain should be installed between the system isolation valve and the tank. If no drain is present, identify another means of discharging water from the tank. Often a plumbing union can be loosened to drain the tank water.

Check the pre-charge pressure and add pressure if needed. Note, it is best to keep the drain open when re-charging the tank so you can determine if air is passing through the bladder/diaphragm and leaving through the drain. If this occurs, the bladder/diaphragm is compromised.

Preventative maintenance will help extend the life of the tank and the bladder. It is important to check areas within the tank that might be subject to loss of pressure or air, such as any tapings or seams on the tank that may have corroded, or a malfunctioning air valve or plug. It is also important to remove the water from the bladder once a year to ensure there are no loss of pressure issues with the tank.

The pre-charge tank function ensures a minimum pressure. A designer will typically determine this based on building height, minimum pressure needed at each fixture, or what will result in the greatest system protection.

To learn about correctly sizing an expansion tank, check out this related article:

https://www.westank.com/how-to-size-well-water-and-pressure-booster-tanks/
February Employee Spotlight

February Employee Spotlight

February Employee Spotlight

David Shirrell, or DJ as he is known at Wessels Company is in the Shipping and Receiving Department.  He has been with Wessels for over 3 years and has held two different jobs.  When he’s not at work, DJ can be found watching football and rooting for the Indianapolis Colts and Philadelphia Eagles.  He also enjoys showing and building custom cars, truck and motorcycles. He enjoys upgrading and installing car audio systems and custom vehicle parts.

February Employee Feature for David Shirrell.
DJ Shirrell

DJ fast facts:                                                                  

Favorite color:  Red

Favorite food: Pizza                                                                    

Likes: spending time with his family and the outdoors

Dislikes: rude people, racism and negativity

Hobbies: car audio, sports, custom vehicles

Hidden Talent: singing

January Employee Spotlight

January Employee Spotlight

January Employee Spotlight

Rosy Thlanem is one of Wessels Company’s human resources and interpreter.  Rosy has been with the company for over three and a half years.  She enjoys spending time with her family, attending church and church functions.  She speaks several languages, including but not limited to English, Burmese, Lautu, Halkha and Falam.  In her spare time, she enjoys dancing and teaching bible classes to children. 

Rosy fast facts:                                                                                           

Favorite
color:  red and purple

Favorite
food: Asian                                                    

Likes: spending time with family
and attending church

Hobbies: dancing

Hidden Talent: composing music
and writing songs.

Rosy fast facts:                                                                                           

Favorite
color:  red and purple

Favorite
food: Asian                                                    

Likes: spending time with family
and attending church

Hobbies: dancing

Hidden Talent: composing music
and writing songs.


How To: Bladder Replacement for Wessels Expansion Tanks

How To: Bladder Replacement for Wessels Expansion Tanks

Changing an expansion tank removable bladder is easy.  Let’s go through it step by step.

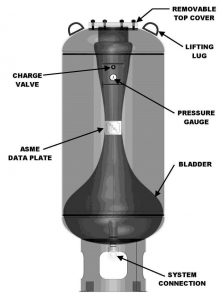
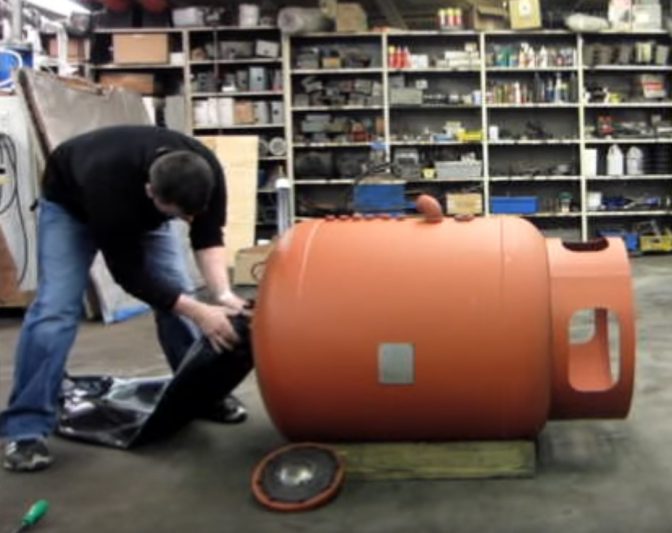
Begin by isolating the expansion tank from the system.  Remove valve cap and unscrew the valve core to release the air charge and then carefully lay the tank on its side to drain water out.

Next, remove the elbow connector at the base of the tank and remove jam nut.  Push the bottom system connection into the tank.  Remove the top cover from the tank and pull the bladder out. Be sure to save the jam nut and system connection as they are not a part of the bladder replacement package.

Clean the bottom system connection.  Then inspect the bladder to make sure there are no sharp edges from the connection that can cut you or the bladder.

Inspect the inside of the tank for moisture, debris, or sharp edges.  Any sharp edges should be ground smooth or touched up with sand paper.  This will prevent the new bladder from rupturing by rubbing up against them.

Remove the new bladder from the box and inspect it for tears or holes before installing it into the tank.  Drop the bottom system connection into the bladder and insert into the bottom opening.

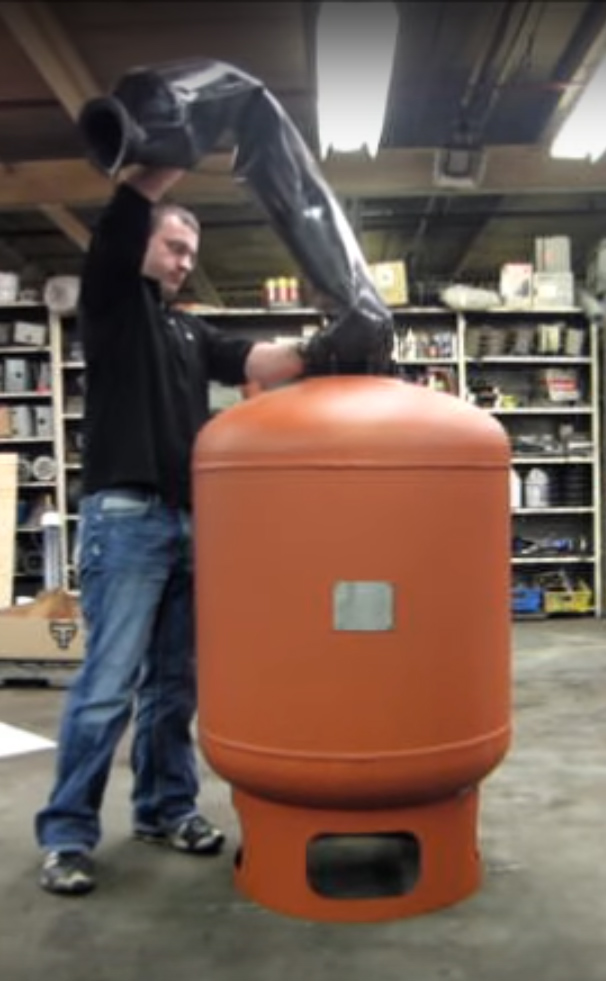
Carefully set the tank upright.  Lay out the new bladder and roll it vertically to allow the entire bladder to fit into to hole in the top of the tank and guide the bladder inside.

Pull the bottom system connection through and screw the jam nut on the bottom. Return the tank to its side to allow for easier installation of the bladder. Tighten the jam nut with a pipe wrench to a hand tightened strength plus ¾ of another turn.

Wrap the bottom system connector with Teflon tape, apply pipe sealant and attach the elbow connector to the bottom system connector.  Before putting the top cover back on, make sure the bladder is seated inside the tank properly and is not twisted.

Re-attach the top cover evenly, tightening bolts in a star pattern. If using an impact gun to tighten, use 50 – 60 lbs. of pressure on your settings.  Stand the tank back up, secure the valve core, and pre-charge tank to minimum system pressure.

Your new bladder is now installed, and the expansion tank is ready to be introduced back into the system.  Make sure you check the pressure 24 hours after installation to ensure pressure is holding.  After that, check the pressure every 6 – 12 months.  Under normal application, the unit should not lose more than 1 lb. per year at most.

If you have any questions about the bladder, tank, or installation, please call the Wessels Company office at 317-888-9800.
Wessels also has a handy youtube video which breaks down the process in easy to follow steps:

November Employee Spotlight

November Employee Spotlight

Tim Peiffer is Wessels Company’s Vice President of Operations and has been part of the Wessels family for over 10 years.  Tim has been the VP of Operations nearly 3 ½ years.  He likes getting together with friends and watching his favorite local band perform.  He also likes to exercise and watch Ohio State during football season.  Tim says he’s a handyman and can generally fix or repair nearly anything.  An interesting fact about him is that he and his wife built their own house with help from family and friends.


Tim fast facts:

Nickname: Timmy

Favorite color:  Blue

Favorite food: Lasagna

Likes: Wessels Company, hanging out with friends

Hobbies: exercising, rooting for Ohio State and Cleveland sports teams

How To: Size Brazed Plate Heat Exchangers

How To: Size Brazed Plate Heat Exchangers

WesPac® Brazed Plate Heat Exchangers feature specially constructed heat transfer plates that are bonded together with brazing material to produce an incredibly strong, compact vessel. Rather than using an adjustable design with replaceable plates like the WesPlate®, these brazed plate heat exchangers cannot be modified, so correctly sizing a unit is very important.

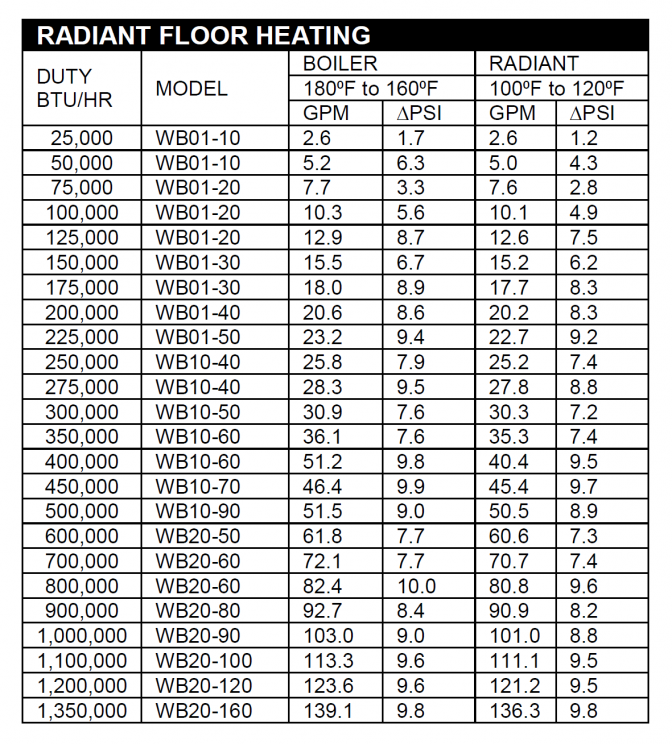
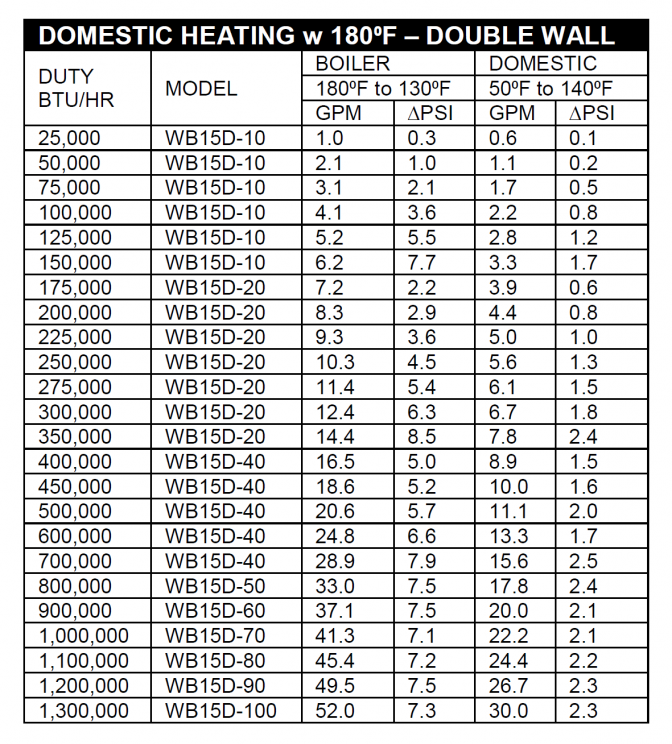
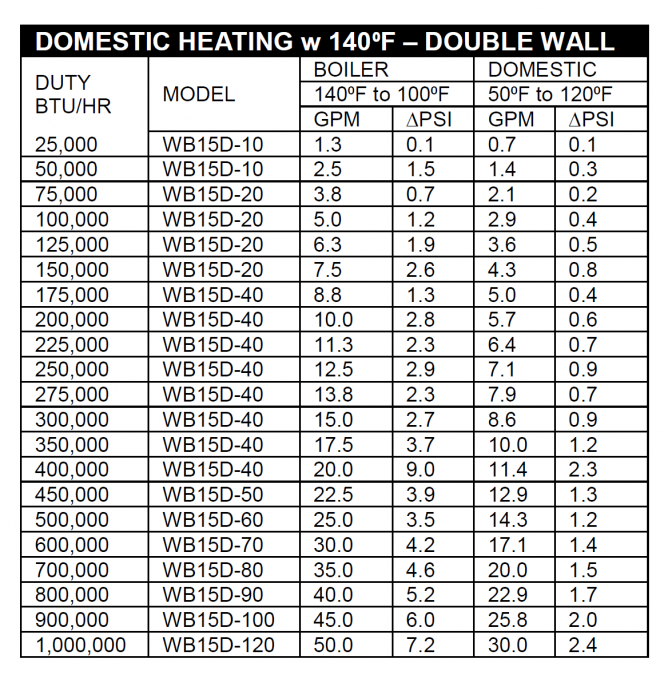
Fortunately, Wessels has produced a few easy-to-use charts for sizing WesPac® brazed plate heat exchangers based on use-case scenarios like radiant floor heating, snow melt, and domestic heating.